
Renting Serialized Units
This article will walk you through the process of renting out a serialized unit.
An Important Note
Before you get started, it is important that you understand there are five states a unit can be in that will prevent you from renting it out. These are as follows:
– Unit is on an open Unit Sale Invoice (as Lizzy will allow you to SELL a rental unit to a customer if you wish).
– Unit is on another open Rental Invoice.
– Unit is on an open (uncomplete) Internal ticket.
– Unit does not yet have its Rental Rates set up.
– Unit has an incomplete Rental Checklist (will be covered in a future article).
If at any point you find yourself unable to rent a given unit, it is probably because one of the five conditions listed above is true.
Creating and Working With a Rental Invoice
To start a Rental Invoice, go to Invoicing->General Invoices->New Invoice. At this point you will be asked to select the contact the invoice is for. Once you do so, you will be asked to choose the type of invoice you wish to create. Choose “Rentals”, which will create the invoice and take you to it.
The structure of a Rental Invoice is fairly simple. You will see two green pluses on this screen; “Add Rental Unit” and “Invoice Items”.
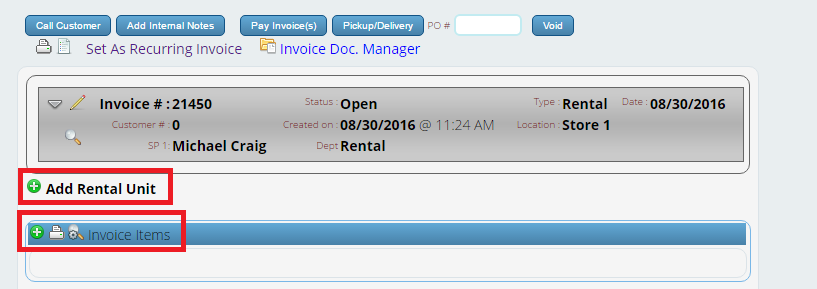
The “Invoice Items” control simply allows you to sell any non-serialized item you wish at the same time you rent out a unit. It works exactly the same as it does on a part sale.
To add a rental unit to this invoice, click the “Add Rental Unit” plus. This will bring up the window shown below.
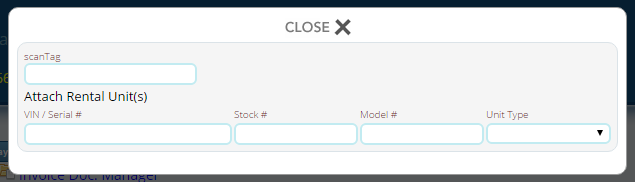
Here, you can locate the unit you wish to rent by VIN/Serial Number, Stock Number, Model Number, and Unit Type. Once you choose at least one of these filters, a list of the units available to rent matching your criteria will appear. Next, simply click “Add” next to the unit you wish to rent. You will then see the following window.

This window is where you set the date and time this rental unit is being taken out. On the right side of the window you will see a date field. Here, you can choose the date the rental is taking place (defaults to current date). You can also move forward/back a day at a time by using the “Previous Day” and “Next Day” links to the left of the date field.
Once you have set the correct date, click the calendar icon next to the time the unit is leaving your store. Note that the available times here are determined by the Hours of Operation for your rental department. When you click the calendar icon, the following window will appear.
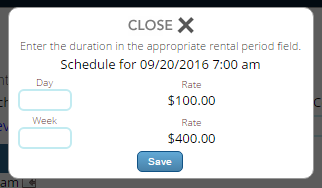
For each rental period you set a rate for on this unit, you will see a box. Enter in the appropriate box the length of time they are renting the unit for. For instance, in the example above, if I wanted to rent the unit out for three days, I would enter “3” in the Day box. After doing this, click the Save button.
You can repeat this process for as many units as you wish to rent out.
To the left of the description of each unit on the invoice, you will see four icons, three of which we are concerned with here; The Trash Can, the Calendar Icon and the Grey Arrow.
– Clicking the Trash Can will remove a unit from the invoice.
– Clicking the Calendar Icon will allow you to change the date/time the unit is being rented for.
– Clicking the Grey Arrow will expand the unit as shown below.
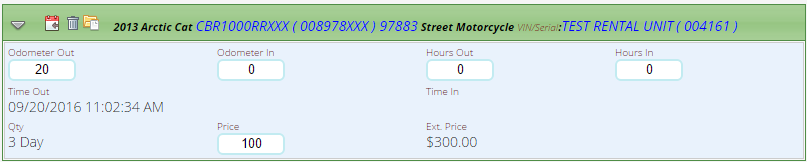
Here, you will see two sets of boxes; Odometer Out/In and Hours Out/In. The former is used for units that have an odometer, the latter for units that have a hobbs meter or something similar for tracking hours run instead. In both cases, the “Out” field indicates the miles/hours on the unit at the time it is rented, and the “In” field (which you must fill in) indicates the miles/hours on the unit when it is returned to your dealership. When you enter data into these fields, it is written to the unit when the rental invoice is closed out. So should you notice the “Out” value is incorrect you can correct it here, and the new reading you enter into the “In” field will of course save to the unit as well.
Notice there is one final box here as well, one for Price. If you wish to charge a customer a different rate than is standard for the unit and time rented, you can change the value here to whatever you wish to charge.
Cashing Out a Rental Invoice
The first thing you need to understand about cashing out a rental invoice is that it is not done until the unit is RETURNED. If you, like many dealers, take payment when the unit leaves rather than when it comes back, you would handle this by taking a deposit for the invoice by clicking the “Create Deposit for this Ticket” button located at the bottom. You would then simply use that deposit against the invoice when you cash it out.
The second thing you need to know is that filling out the Odometer In or Hours In box (as appropriate) is what tells Lizzy that the unit has been returned. Until you do this, you CANNOT cash out the invoice. If you try, you will not see the invoice on the list of invoices to pay when you click the “Pay Invoice” button.
Aside from the above, there is nothing different about cashing out a Rental Invoice than there is any other. Simply fill out the appropriate Odometer/Hours field, click the “Pay Invoice” button, and take payment/use deposits against the invoice as you would normally.
Hopefully you find this article helpful.